My original guide on how to help fix screen-tearing on Linux with an NVIDIA GPU is a bit dated, so here’s an even easier way.
Notes
You will likely need the 375.26 driver or newer for this to show up in "nvidia-settings".
These options may cause a loss in performance. For me personally, the loss is next to nothing.
It probably won't work with Optimus right now, but this may be fixed in future.
What to do
Previously you needed to edit config files, and it was a little messy. Thankfully, NVIDIA added options in nvidia-settings to essentially do it all for you. The options were added in a more recent NVIDIA driver version, so be sure you're up to date.
Load "nvidia-settings" and you will need to go to this screen and then hit “Advanced” at the bottom (my screenshot doesn't have the button, as this is what you see after you hit it):
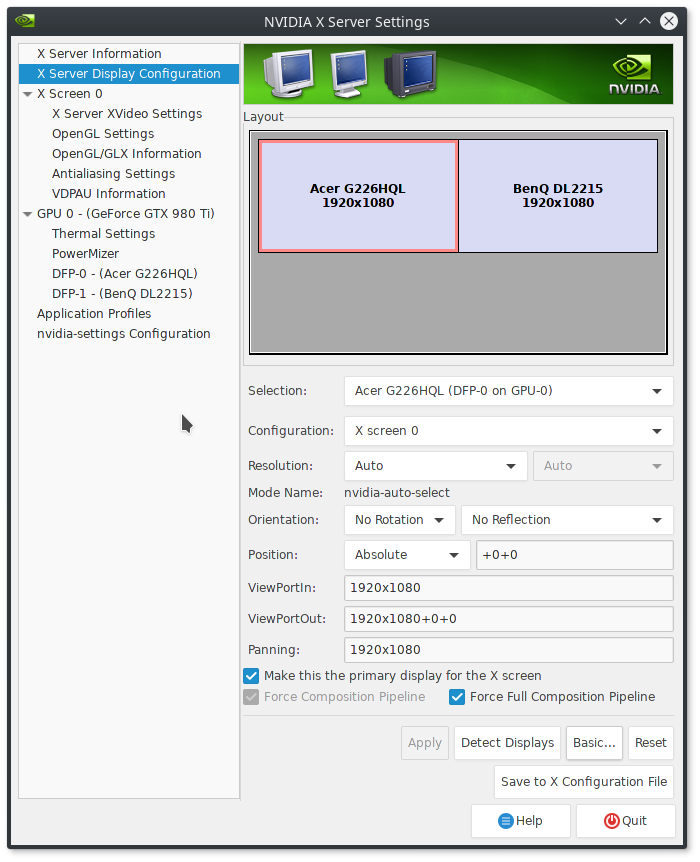
Tick the boxes for “Force Composition Pipeline” and “Force Full Composition Pipeline” and then hit "Apply".
You can then enjoy a tear-free experience on Linux with an NVIDIA GPU. It really is that damn easy now.
Note: You will likely need to run nvidia-settings with “sudo” for the below to work.
If you want this applied all the time on startup (without needing to do anything), you can hit “Save to X Configuration File”. I have mine located at “/etc/X11/xorg.conf.d/xorg.conf” on Antergos, but your location may be different. I also recommend backing any existing xorg.conf file up if one exists.
This step isn't needed, but it's a fun and useful extra!
I also have mine set to a script and then to a keyboard shortcut, for those times when a game reverts the desktop to a low resolution after exiting, or when a game turns off a second monitor, this will turn it back on.
For that I manually set the resolution like so:
Edit that for your details, like your resolution and monitor connections (you can see them by running "xrandr --query" in terminal), and then save it as an easy to remember filename. You can then set it as a custom shortcut, I use “CTRL+ALT+F4” as it’s not used for anything else.
This has been tested and works for me perfectly across Ubuntu Unity, Ubuntu MATE and Antergos KDE.
Notes
You will likely need the 375.26 driver or newer for this to show up in "nvidia-settings".
These options may cause a loss in performance. For me personally, the loss is next to nothing.
It probably won't work with Optimus right now, but this may be fixed in future.
What to do
Previously you needed to edit config files, and it was a little messy. Thankfully, NVIDIA added options in nvidia-settings to essentially do it all for you. The options were added in a more recent NVIDIA driver version, so be sure you're up to date.
Load "nvidia-settings" and you will need to go to this screen and then hit “Advanced” at the bottom (my screenshot doesn't have the button, as this is what you see after you hit it):

Tick the boxes for “Force Composition Pipeline” and “Force Full Composition Pipeline” and then hit "Apply".
You can then enjoy a tear-free experience on Linux with an NVIDIA GPU. It really is that damn easy now.
Note: You will likely need to run nvidia-settings with “sudo” for the below to work.
If you want this applied all the time on startup (without needing to do anything), you can hit “Save to X Configuration File”. I have mine located at “/etc/X11/xorg.conf.d/xorg.conf” on Antergos, but your location may be different. I also recommend backing any existing xorg.conf file up if one exists.
This step isn't needed, but it's a fun and useful extra!
I also have mine set to a script and then to a keyboard shortcut, for those times when a game reverts the desktop to a low resolution after exiting, or when a game turns off a second monitor, this will turn it back on.
For that I manually set the resolution like so:
nvidia-settings --assign CurrentMetaMode="DVI-I-1:1920x1080_60 +0+0 { ForceFullCompositionPipeline = On }, HDMI-0:1920x1080_60 +1920+0 { ForceFullCompositionPipeline = On }"Edit that for your details, like your resolution and monitor connections (you can see them by running "xrandr --query" in terminal), and then save it as an easy to remember filename. You can then set it as a custom shortcut, I use “CTRL+ALT+F4” as it’s not used for anything else.
This has been tested and works for me perfectly across Ubuntu Unity, Ubuntu MATE and Antergos KDE.
Some you may have missed, popular articles from the last month:
All posts need to follow our rules. For users logged in: please hit the Report Flag icon on any post that breaks the rules or contains illegal / harmful content. Guest readers can email us for any issues.
For reverting the resolution, after a game didn't set it back, I used so far:
Have to check if this affects tearing, if the corresponding settings are saved in the xorg.conf file.
xrandr --output DP0 --mode 1920x1080Have to check if this affects tearing, if the corresponding settings are saved in the xorg.conf file.
0 Likes
i need to set every reboot 144 Hz... Btw "force full composition" disable gsync. I use it only for vulkan games beacuse gsync on vulkan it's not supported at moment
Last edited by fabry92 on 11 Jan 2017 at 4:36 pm UTC
Last edited by fabry92 on 11 Jan 2017 at 4:36 pm UTC
1 Likes, Who?
Hopefully nVidia users will be able to use Wayland soon too :)
1 Likes, Who?
Weird. I've been having screen tearing issues for a while, but when I launch the NVIDIA X Server Settings application under Linux Mint 18.1, what I get is a different screen from you. I don't know how to resolve this issue, as I'd really like to get rid of tearing, especially on my external monitor. Video Playback on my BenQ external monitor is pretty bad.

Anyone has a clue? Would be much grateful for some help :)
Last edited by Twomby on 11 Jan 2017 at 4:51 pm UTC

Anyone has a clue? Would be much grateful for some help :)
Last edited by Twomby on 11 Jan 2017 at 4:51 pm UTC
0 Likes
@Twomby, you likely need to update your driver.
Also, as stated, click Advanced.
Last edited by Liam Dawe on 11 Jan 2017 at 4:52 pm UTC
Also, as stated, click Advanced.
Last edited by Liam Dawe on 11 Jan 2017 at 4:52 pm UTC
1 Likes, Who?
@Twomby, you likely need to update your driver.
Also, as stated, click Advanced.
Whether I click Basic or Advanced, I get the same screen.

Should have posted a screengrab with Advanced settings to avoid confusion. My NVIDIA drivers are the latest version (375.10 BETA).
Last edited by Twomby on 11 Jan 2017 at 5:01 pm UTC
0 Likes
Hmm... I wonder why I've had no need for this stuff on at least three generations of Nvidia cards. Maybe it's down to my choice of compositor? I remember having trouble with video tearing at some point, but that was before VDPAU support in players.
EDIT:
Did you update nvidia-settings as well? Also, the latest version is 375.26, right?
Last edited by tuubi on 11 Jan 2017 at 5:02 pm UTC
EDIT:
@Twomby, you likely need to update your driver.
Also, as stated, click Advanced.
Whether I click Basic or Advanced, I get the same screen. Should have posted a screengrab with Advanced settings to avoid confusion. My NVIDIA drivers are the latest version (375.10 BETA).
Did you update nvidia-settings as well? Also, the latest version is 375.26, right?
Last edited by tuubi on 11 Jan 2017 at 5:02 pm UTC
1 Likes, Who?
Try the 375.26 driver.@Twomby, you likely need to update your driver.
Also, as stated, click Advanced.
Whether I click Basic or Advanced, I get the same screen. Should have posted a screengrab with Advanced settings to avoid confusion. My NVIDIA drivers are the latest version (375.10 BETA).
1 Likes, Who?
Liamdawe, Tuubi, you are absolutely right. Somehow I ended up on the BETA drivers page, and wasn't aware there was a new stable release. Will install and report back. Thanks guys! (I must admit I feel a little bit stupid at the moment.)
Last edited by Twomby on 11 Jan 2017 at 5:09 pm UTC
Last edited by Twomby on 11 Jan 2017 at 5:09 pm UTC
0 Likes
Opening things graphically as superuser can bring problems
It's better after "Save to X Configuration File" go to "Show Preview ..." copy all the text and in terminal as superuser: nano /etc/X11/xorg.conf (Previously backed up and the path may be different) Then paste all the text and save the new file.
Last edited by CJOR on 11 Jan 2017 at 5:42 pm UTC
It's better after "Save to X Configuration File" go to "Show Preview ..." copy all the text and in terminal as superuser: nano /etc/X11/xorg.conf (Previously backed up and the path may be different) Then paste all the text and save the new file.
Last edited by CJOR on 11 Jan 2017 at 5:42 pm UTC
1 Likes, Who?
Sorry for dumb question but if I have two monitors, I should set the Force Composition Pipeline /Force full composition pipeline - for both of them, right?If you want avoid tearing in both, yes.
0 Likes
Ah, I was hoping it was a real fix that didn't rely on hacky work-arounds.
Last edited by Mountain Man on 11 Jan 2017 at 5:37 pm UTC
Last edited by Mountain Man on 11 Jan 2017 at 5:37 pm UTC
0 Likes
Ah, I was hoping it was a real fix that didn't rely on hacky work-arounds.That fix is called Wayland.
2 Likes, Who?
Opening things graphically as superuser can bring problemsNever had an issue with it before and i've been using it for years.
0 Likes
Wasn't able to upgrade to latest version. Got a bunch of issues with the installer under Mint 18.1. Reverted back to 367.57 for the time being, but will definitely try again when I have more time on my hands. Thanks for this article and for the support provided by commenters!
0 Likes
Wasn't able to upgrade to latest version.
Maybe you should try official drivers from www.nvidia.com.
I know, this method has some drawbacks (like the need to manually reinstall the drivers from the console after every kernel update) but using this method you will get the top-quality latest drivers directly from the manufacturer (and thus will blip on their radar as a Linux user), not some potentially buggy distro-packaged drivers. I know, Fedora, for example, has outrageously bad nvidia drivers (partially that's because they support only "nouveau" and the quality of "rpmfusion" third-party repository is not that good).
2 Likes, Who?
Isn't that exactly what he did?Wasn't able to upgrade to latest version.
Maybe you should try official drivers from www.nvidia.com.
If your distro packages the latest proprietary drivers, there's rarely any reason to use the Nvidia installer instead. For Mint I recommend Ubuntu's semi-official [Proprietary GPU drivers PPA](https://launchpad.net/~graphics-drivers/+archive/ubuntu/ppa).
Last edited by tuubi on 11 Jan 2017 at 6:24 pm UTC
0 Likes
i'll do the ultimate test. dying light. that game was so shitty full of tearing. report later :-)
0 Likes
I am wondering if the title/description is OK. If it is a fix for all nvidia cards, or if for some cards only. I found the solution several days ago and I must say that it not only fixes tearing but overall performance in Linux gaming. The stutter in Saints row the third was unbearable. For the past few months I have been using openbox with compton, but it is better to fix that in xorg. However if I plug/unplug monitors it may be cumbersome to rewrite xorg, or to be force to update the setting each and every time.
Still better than windows.
Yesterday I was backupping external drive storage, which took a while. Unfortunately for me windows decided to install updates and my process was blocked half-through. Thank you Microsoft.
Still better than windows.
Yesterday I was backupping external drive storage, which took a while. Unfortunately for me windows decided to install updates and my process was blocked half-through. Thank you Microsoft.
0 Likes
Not working on my optimus laptop, I have the same problem @Twomby has, even with the latest drivers (375.26)
I think that I'll need to wait until xorg server 1.19 comes out to stop seeing the damn annoying screen tearing
I think that I'll need to wait until xorg server 1.19 comes out to stop seeing the damn annoying screen tearing
0 Likes



 How to set, change and reset your SteamOS / Steam Deck desktop sudo password
 How to set up Decky Loader on Steam Deck / SteamOS for easy plugins
See more from me